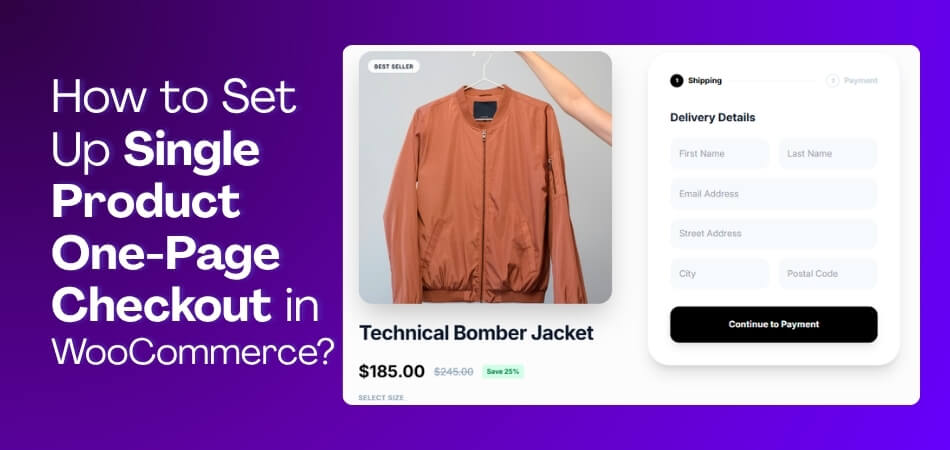
Single product one-page checkout in WooCommerce helps customers buy one item from a dedicated page without moving through separate product, cart, and checkout steps. Shoppers get a shorter purchase path, fewer distractions, and a more focused buying experience that can support better conversion rates.
In this guide, you’ll learn how to set up single product one-page checkout in WooCommerce in the most practical methods. You’ll also see which approach fits different store needs and what to check if the checkout flow does not work as expected.
Quick Set Up Tips
Faster setup comes from building the checkout around one clear purchase action instead of a full store journey. Before going into the full method, make sure the product, page, and checkout behavior all support a smooth one-item purchase.
- Use a dedicated page for the product
- Send buyers through one clear checkout path
- Add only the fields needed to complete the order
- Match the checkout setup to the product type
- Make the main action button easy to find
- Check that totals and payment options load correctly
What Makes a Single Product Checkout Different From a Normal One Page Checkout?
A single product checkout focuses on selling one item at a time, while a normal one page checkout handles many items in the cart. Both aim to make buying simple, but they work in different ways. The table below shows how they compare in clear and easy words.
| Aspect | Single Product Checkout | Normal One Page Checkout |
| Focus | Made for one specific product. | Works with many products in the cart. |
| Speed | Faster because the buyer sees only one item. | A bit slower since it shows all selected items. |
| Layout | Simple layout with fewer fields. | More fields because it covers different items. |
| User Choice | Buyers cannot add more items on the same page. | Buyers can add, remove, or edit cart items. |
| Conversion Goal | Pushes quick buying for one item. | Supports a full shopping experience. |
Both checkout styles serve different needs. Single product checkout is quick and focused, while the normal one page checkout gives more control. To make the process even better, you can try options like One Page Checkout for WooCommerce for a cleaner experience.
What to Prepare Before Setting Up Single Product One-Page Checkout in WooCommerce?
Single product one-page checkout in WooCommerce works better when core store settings and product details are ready before setup starts. Preparing these essentials first helps reduce setup errors and keeps the checkout flow smoother from the beginning.
- Choose The Target Product: Select the single product you want customers to purchase through the dedicated one-page checkout flow.
- Review Product Details: Confirm that the product title, price, images, stock, and product type are fully set up.
- Set Up Payment Methods: Make sure at least one payment gateway is active, tested, and ready for customer transactions.
- Check Shipping Settings: Review shipping zones, methods, and costs if the product needs delivery during checkout.
- Verify Tax Configuration: Confirm tax settings are correct so customers see accurate totals before placing orders.
- Decide The Checkout Method: Choose between one-page checkout, direct checkout, or a dedicated product checkout page.
- Test Theme Compatibility: Check that your theme supports the checkout layout without breaking design or functionality.
- Prepare For Test Orders: Plan to complete a full test purchase before making the checkout available to shoppers.
How to Set Up Single Product One-Page Checkout in WooCommerce?
Setting up a single product one page checkout helps the buyer see the product and finish the payment on the same page. It cuts extra steps and makes the whole process quicker. Follow these simple methods to set up single product one-page checkout in your WooCommerce store.
Method 1: Using a Plugin
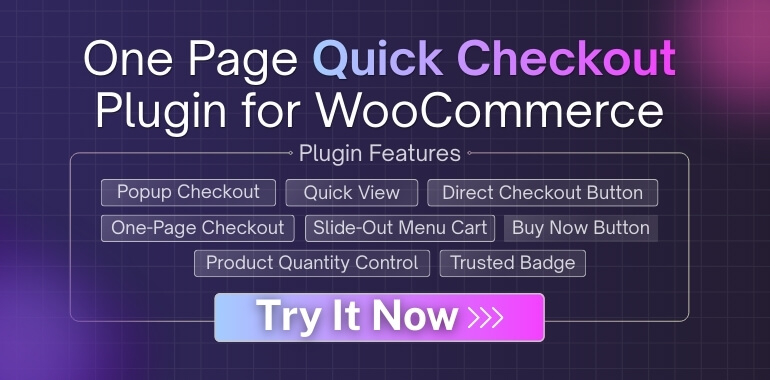
This is the easiest way because the plugin handles most of the setup for you. Many store owners use this WooCommerce One Page Checkout plugin to create a clean single product checkout without extra steps. It helps you set everything up quickly and gives you more control over how the checkout works.
Step 1: Install the Plugin
Here is how to install the plugin:
Free Version
- Go to WordPress Admin Dashboard
• Go to Plugins > Add New
• Search for One Page Quick Checkout for WooCommerce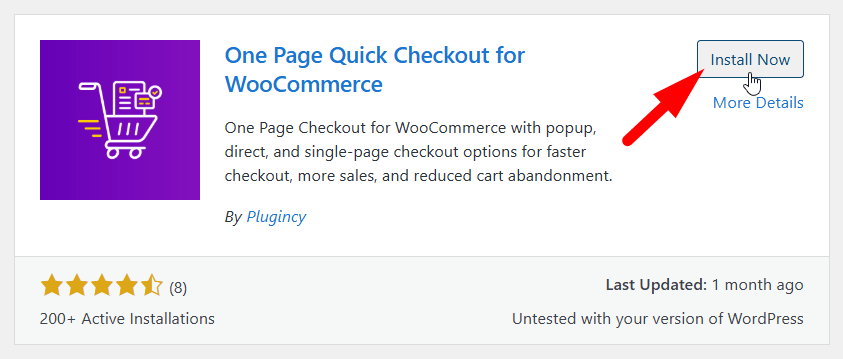
• Click Install Now, then Activate
Pro Version
- Buy the PRO version from the official website.
• Download the ZIP file from your email
• Go to Plugins > Add New
• Click Upload Plugin and choose the ZIP file
• Click Install Now, then Activate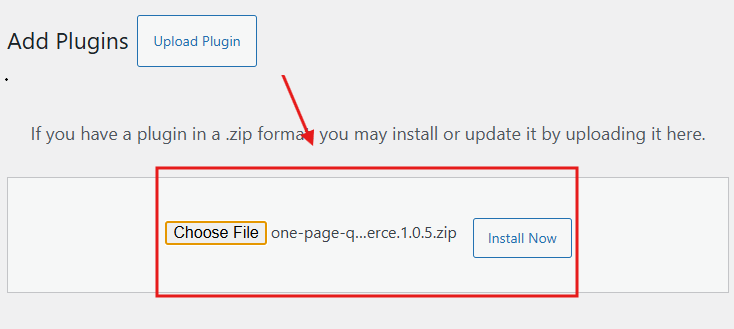
Step 2: Enable One Page Checkout Feature
This step makes sure the plugin’s one page checkout system is active and ready to use.
- Go to Onpage Checkout > One Page Checkout
• Turn the Enable One Page Checkout switch ON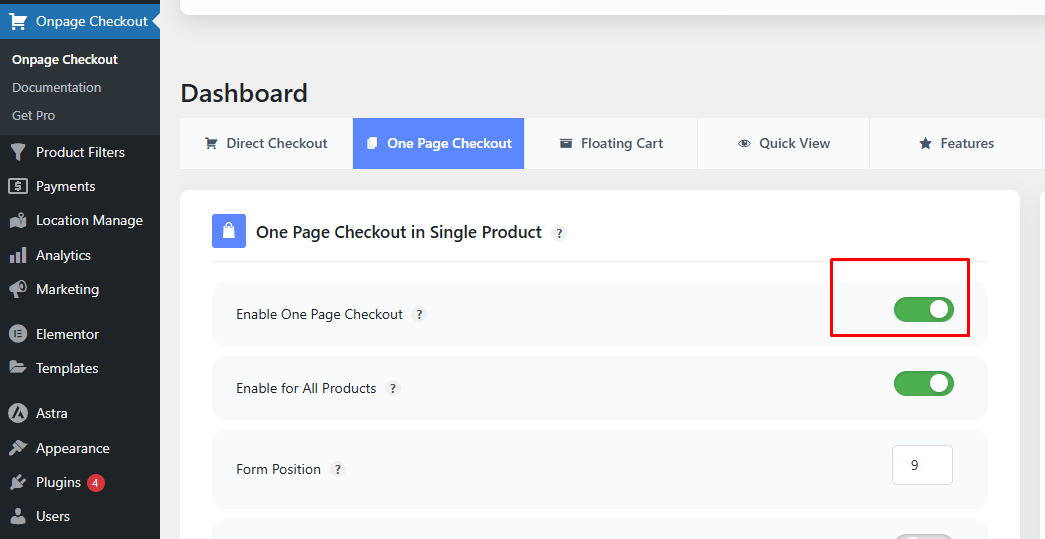
Step 3: Enable One Page Checkout for Individual Products
Use this step if you want the one page checkout to appear only on certain products.
- Go to Products in your dashboard
• Click Edit on the product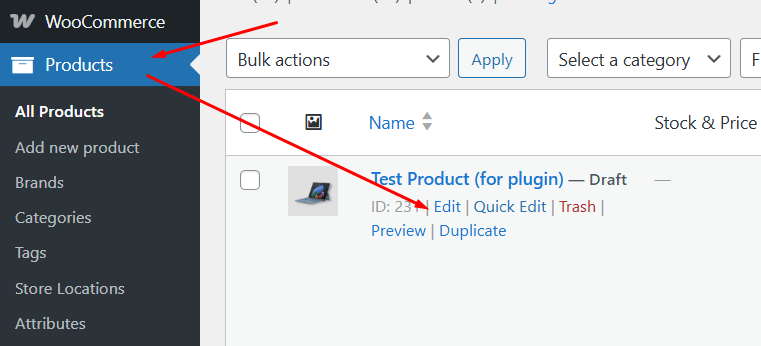
- Scroll to the One Page Checkout section
- Turn on the option
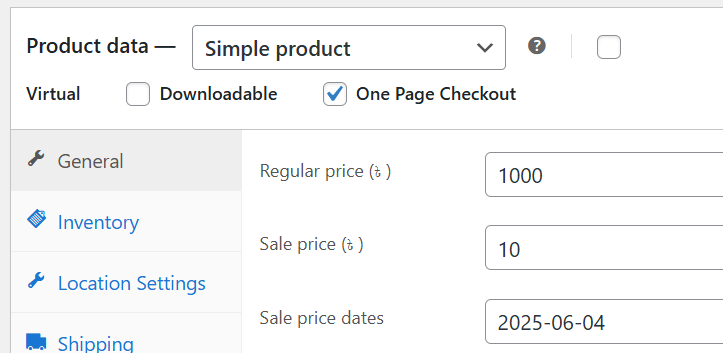
- Save and publish
Now your product will show the checkout form directly on its page.
Method 2: Using Shortcodes (No Plugin)
This method uses WooCommerce built-in shortcodes.
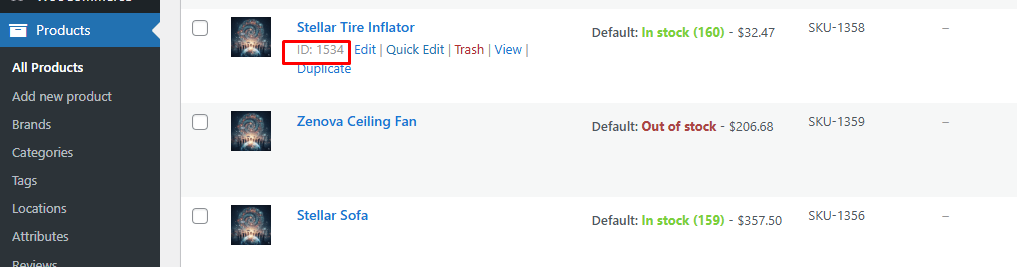
Step 1: Find the Product ID
- Go to Products → All Products.
- Hover over your product and copy the product ID.
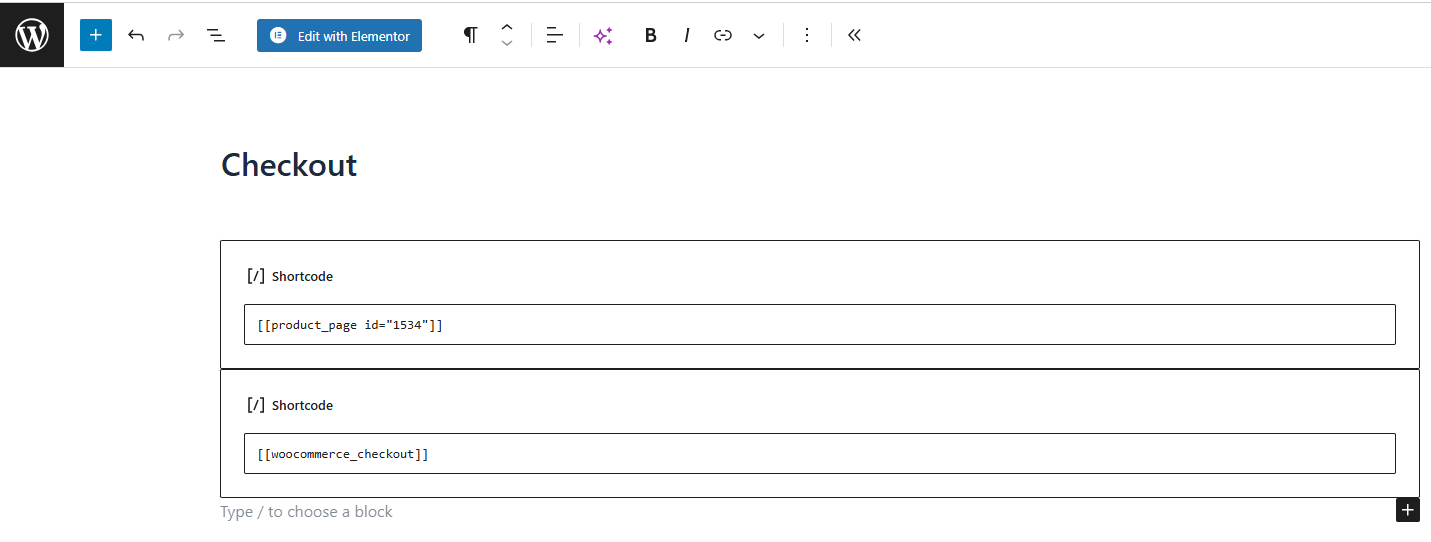
Step 2: Create a New Page
- Go to Pages → Add New.
- Name the page (for example: Checkout).
Step 3: Add Shortcodes
Paste this code into the page editor:
[product_page id="123"]
[woocommerce_checkout]
Replace 123 with your product ID.
Step 4: Publish and Test
- Publish the page.
- Add the product and complete a test order.
Result
- One product
- One page
- Checkout form visible instantly
Method 3: Using WooCommerce Default System (No Plugin, No Shortcodes)
This method sends buyers directly to checkout with one product already added.
Step 1: Enable Cart Redirect
- Go to WooCommerce → Settings → Products → General.
- Enable Redirect to the cart page after successful addition.
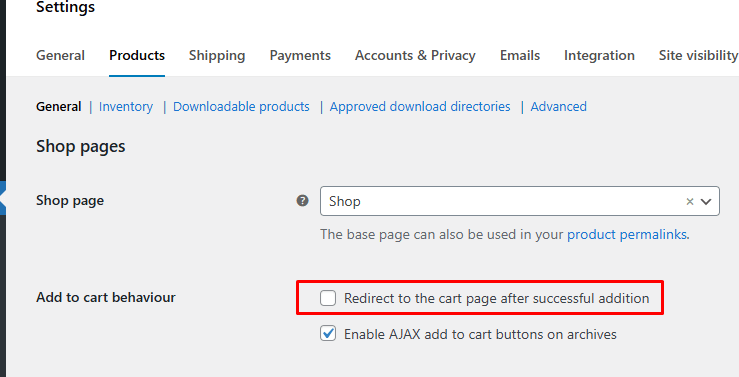
- Save changes.
Step 2: Confirm Checkout Page
- Go to WooCommerce → Settings → Advanced.
- Make sure the checkout page is selected correctly.
Step 3: Create Direct Checkout Link
Use this link format:
https://yourwebsite.com/checkout/?add-to-cart=123
Replace 123 with your product ID.
You can place this link on:
- Buttons
- Landing pages
- Menu items
Result
- One click adds a product
- Buyer lands straight on checkout
Final Recommendation
Each method works well in different situations. The table below gives a quick look at which method is best for your store and why you might choose it.
| Method | Best For | Why Choose It | Notes |
| Method 1: Using a Plugin | Users who want the easiest and most powerful setup | Gives full control, ready-made layout, one-page checkout for selected products | Best overall choice for smoother setup and better sales flow |
| Method 2: Using Shortcodes | Users who want a no-plugin solution | Simple to set up and keeps the site light | Limited design control and fewer features |
| Method 3: WooCommerce Default System | Users who only need a direct checkout link | Fast setup and works without plugins or shortcodes | Does not show the product and checkout together on the same page |
Design Tips to Get More Orders From Your Single Product Checkout
A well-designed checkout page can turn a visitor into a paying customer in seconds. The design should feel simple and trustworthy. Below are some helpful tips to improve your single product checkout page and bring in more orders.
- Highlight the Product Clearly: Make sure the product image and title are big, clear, and easy to spot. It builds confidence and reduces second-guessing.
- Keep the Layout Distraction-Free: Remove sidebars, banners, and any extra links that pull focus. Clean pages guide buyers smoothly to the payment button.
- Use Fewer Form Fields: Only ask for what’s needed to complete the order safely. Short forms feel quick and encourage people to continue.
- Add Trust Signals and Guarantees: Show security badges, reviews, or money-back promises near the button. It helps build trust and lowers buyer hesitation.
- Make the Call-to-Action Stand Out: Use a large, bright button that says exactly what will happen. A clear message like “Buy Now” helps speed up decisions.
- Use Sticky Checkout Buttons: Make sure the “Buy” button stays visible while scrolling. This way, the buyer won’t have to look for it again.
- Test Mobile Responsiveness Carefully: Most people order using their phones now. Everything must load fast, look good, and work smoothly on smaller screens.
Testing Your Single Product One-Page Checkout Before Going Live
Testing your single product one-page checkout before launch helps catch payment, redirect, and layout problems before real customers see them. A complete test also shows whether the checkout works smoothly across devices, browsers, and product types, including one-page checkout for WooCommerce digital downloads.
- Check Page Speed And Load Issues: Make sure the checkout page opens quickly and all key sections load without broken scripts or missing content.
- Review Add To Cart Behavior: Confirm the product adds correctly and follows the intended checkout path without loops, blank pages, or duplicate actions.
- Validate Form Fields Properly: Test empty, incorrect, and valid entries to confirm field rules, required inputs, and error messages work correctly.
- Test Payment Gateways In Sandbox Mode: Run successful, failed, and canceled transactions to check payment flow, order updates, and digital delivery behavior.
- Verify SSL And Secure Content: Confirm the full checkout page loads under HTTPS without mixed content warnings or insecure page elements.
- Test Across Browsers And Devices: Open the checkout on mobile, tablet, and desktop using major browsers to catch layout or script issues.
- Check Emails And Order Status Updates: Place test orders and verify customer emails, admin alerts, and WooCommerce order statuses update correctly.
- Look For Theme And Plugin Conflicts: Test with a default theme and limited plugins to identify conflicts affecting checkout performance or behavior.
Examples of How Different Stores Improve Their Checkout Flow
Many stores make small changes to help buyers move through checkout with ease. Simple updates often fix common problems and help more people finish orders. The examples below show how different stores improve their checkout flow.
Clothing Store With Quick Size Checks
To improve the shopping experience, the store owner worked on optimizing WooCommerce checkout for fashion stores with simple size tips beside each product. Clear size help made picking easier and faster. Better choices lowered wrong orders and raised trust. This small change helped the checkout feel smoother for buyers.
Beauty Store With Smart Auto Fill
Shoppers liked faster forms, so the store added easy auto-fill. Basic details are filled in right away, cutting typing time. Fewer mistakes made ordering feel calm and simple. This helped more buyers finish their checkout without trouble.
Gadget Store With Live Stock Alerts
People liked seeing stock alerts near the buy button. Clear updates helped them act fast when items ran low. Real-time info built trust during checkout. This pushed more shoppers to complete their orders quickly.
Book Store Using Clean Payment Choices
Readers wanted simple payment steps, so the store showed fewer options first. Buyers picked one choice and moved ahead with ease. Shorter lists cut confusion and save time. Clean choices helped more people reach the last step.
Fitness Store With Clear Shipping Times
Many buyers worried about late orders, so the store showed clear shipping times early. Honest dates helped people plan their buy. Clear info helped shoppers feel safe placing orders. This reduced last-second drops during checkout.
Frequently Asked Questions
Many store owners still have small doubts before using a single product checkout. These questions cover extra things that were not explained above. The answers will help you understand how this setup works in real store situations.
Can I Use Single Product Checkout With Variable Products?
Yes, you can use it with product variations without trouble. The buyer can pick a size or color before checking out. It works the same as a normal product, just on one page.
Does Single Product Checkout Work With Subscription Products?
It works with most WooCommerce subscription plugins. Buyers can start a plan from the same page. Always test once to make sure billing renews correctly.
Can I Add Custom Fields To My Single Product Checkout?
Yes, you can add extra fields if needed. Many plugins allow custom inputs like notes or upload boxes. Keep fields light so the checkout stays quick.
Why Do Some Stores Prefer One Page For Single Products?
Stores like faster buying because it cuts extra steps. Less clicking helps more people finish orders. Simple pages also reduce confusion for new buyers.
How Does Inventory Update With Single Product Checkout?
The stock reduces right after a successful order. WooCommerce handles this without extra settings. Always keep stock numbers updated to avoid problems.
Which Payment Methods Work Best On Single Product Pages?
Most stores use simple methods like card or wallet payments. These work fast and keep buyers moving. Fewer options help people decide quickly.
Where Should Store Owners Place The Checkout Page Link?
Many place it on buttons, banners, or landing pages. A clear link helps buyers reach checkout fast. It also guides them smoothly without confusion.
Who Should Use A Single Product Checkout Setup?
This setup suits brands selling one strong item or a small bundle. It works well for simple products that need fast orders. Many new stores use it to raise quick sales.
How Do Store Owners Test The Checkout On Different Devices?
They open the page on phones, tablets, and laptops. Each screen shows problems that might not appear elsewhere. Testing on many devices keeps the page stable.
When Should A Store Avoid Using Single Product Checkout?
It should be avoided if the store sells many mixed items. Buyers may need to compare, mix, or pick bundles. A cart page works better for those cases.
Conclusion
Getting checkout right can change how buyers feel about your store. A simple, focused setup removes delays, builds trust, and helps people finish orders without stress. When the process feels clear, buyers are more likely to click pay and move forward with confidence.
By following the steps and tips shared above, you now have a clear path on how to set up single product one-page checkout in WooCommerce. Test often, keep things simple, and adjust based on real buyer behavior. A smooth checkout is not just helpful; it directly supports better sales and happier customers.