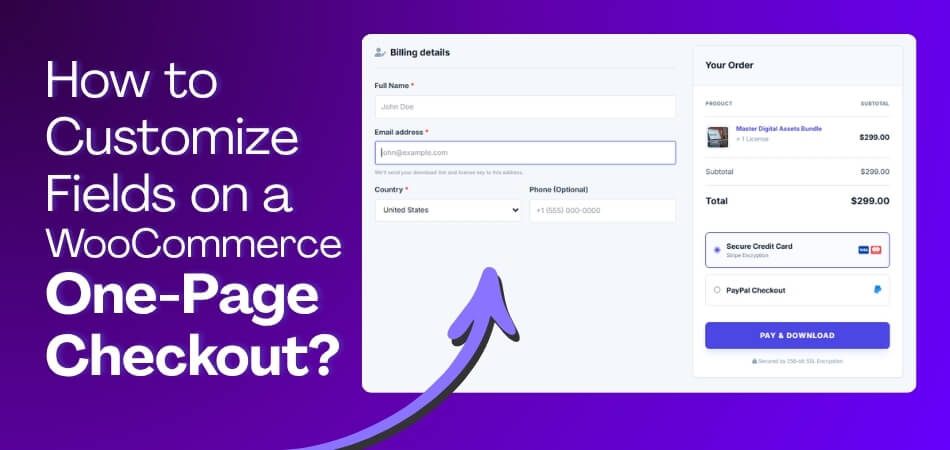
Customizing fields on a WooCommerce one-page checkout helps you control what customers need to fill out before placing an order. Removing unnecessary fields, adjusting required inputs, or adding relevant checkout details can make the page easier to complete and better suited to your product type.
In this guide, you’ll learn how to customize fields on a WooCommerce one-page checkout using the most practical methods. You’ll also see which field changes improve usability, when to keep or remove certain inputs, and what to test before applying changes live.
Quick Field Customization Tips for WooCommerce One-Page Checkout
Field customization works best when each checkout input supports the order instead of adding extra effort. Keeping the form shorter, clearer, and more relevant can improve completion rates and make the one-page checkout easier to use.
- Keep Only Needed Fields
- Match Fields To Product Type
- Limit Required Inputs
- Use Clear Field Labels
- Avoid Long Checkout Forms
- Check Mobile Field Usability
- Review Payment Compatibility
- Test Before Publishing Changes
What Fields Can You Customize on a WooCommerce One-Page Checkout?
WooCommerce one-page checkout fields can be customized in several parts of the form, depending on what information your store needs to collect. Most changes focus on billing, shipping, order details, and any extra fields added for specific products or checkout requirements.
- Billing Fields: Name, email, phone, company, and address-related billing inputs.
- Shipping Fields: Delivery name, address, location, and shipping-related customer details.
- Order Notes Field: Extra instructions, comments, or special requests entered during checkout.
- Additional Custom Fields: Extra inputs added for business, delivery, or product-specific needs.
- Required And Optional Fields: Field rules that decide which inputs must be completed.
- Field Labels And Placeholders: Visible text that helps customers understand what to enter.
- Field Order And Position: The sequence and placement of fields within the checkout form.
Things to Check Before Customizing WooCommerce One-Page Checkout Fields
Field changes work better when the checkout flow, product needs, and store settings are reviewed first. Checking these areas before editing WooCommerce one-page checkout fields helps prevent validation issues, layout problems, and unnecessary checkout friction.
- Checkout Type In Use: Confirm whether your store uses classic checkout settings or block-based checkout, because field customization options can vary between the two.
- Product And Order Needs: Review what customer information is actually necessary so the checkout collects useful details without making the form longer than needed.
- Payment Gateway Requirements: Make sure important billing, contact, or verification fields are not removed if your active payment methods still depend on them.
- Shipping And Tax Setup: Check whether shipping methods, tax calculations, or location-based rules rely on specific checkout fields to work correctly.
- Field Priority And Relevance: Identify which fields are essential, optional, or unnecessary based on the product type and the information required to process orders.
- Theme And Plugin Compatibility: Review whether your theme or WooCommerce One Page Checkout plugin affects field styling, validation, layout structure, or overall form behavior.
- Mobile Form Usability: Check how field size, spacing, order, and tap areas behave on phones so the checkout stays easy to complete.
- Testing Plan Before Launch: Prepare to test the field display, required input behavior, validation messages, and order completion before applying any changes live.
Best Ways to Customize Fields on a WooCommerce One-Page Checkout
WooCommerce one-page checkout fields can be customized in different ways depending on your checkout type, technical comfort, and the kind of field changes you need. Some methods support simple no-code edits, while others allow deeper control over field behavior and block-based checkout changes.
- Advanced Checkout Plugin: Handles field changes through plugin settings, including adding, removing, renaming, or rearranging checkout fields.
- Classic Checkout Code Snippets: Changes field behavior, validation, labels, or required status through WooCommerce code-based customization.
- Additional Checkout Fields For Block Checkout: Supports field customization in stores using WooCommerce’s block-based checkout structure.
How to Customize Fields on a WooCommerce One-Page Checkout: Plugin Method (Recommended)
Customizing fields on a WooCommerce one-page checkout with a plugin gives you an easier way to control which inputs appear during checkout. You can use it to remove unnecessary fields, adjust form sections, and create a cleaner checkout flow without editing code.
Customize fields on a WooCommerce One-Page Checkout by Using a Plugin
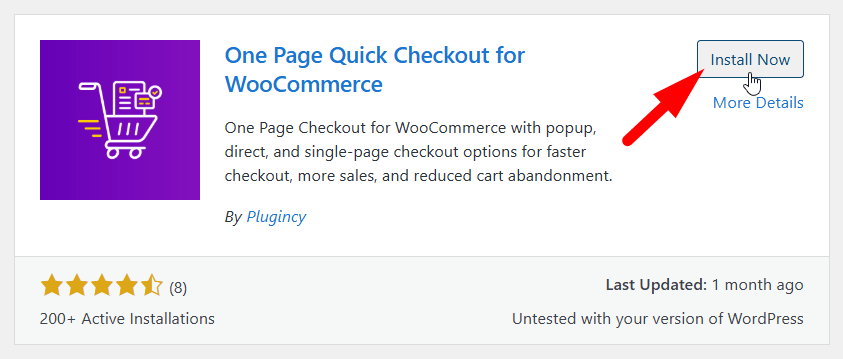
If you are using a plugin like One Page Quick Checkout For WooCommerce by Plugincy, start by enabling one-page checkout and then open the checkout form management settings. From there, you can manage field visibility, headings, and other checkout form elements in one place. Here is the full process to customize fields in WooCommerce One-Page Checkout:
Step 1: Install The Plugin
For the Free Version:
- Go to your WordPress Admin Dashboard.
- Navigate to Plugins > Add Plugin.
- Search for “One Page Quick Checkout for WooCommerce”
- Click Install Now and then Activate.
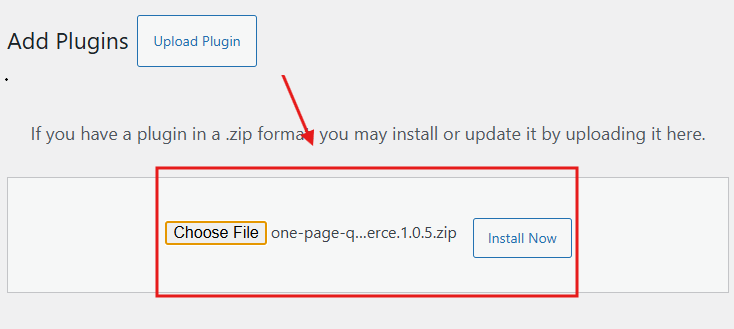
For the Pro Version:
- Visit plugincy to purchase the PRO version.
- After your purchase, you will receive a download link in your email. Click the link to download the ZIP file.
- Go to Plugins > Add Plugins.
- Click Upload Plugin.
- Select the Pro version ZIP file from your device.
- Click Install Now, then Activate.
Step 2: Enable One Page Checkout
After installing the plugin, the One Page Checkout for WooCommerce feature is usually enabled by default. If it’s not, you can easily turn it on manually:
- In your dashboard, go to Onpage Checkout > One Page Checkout.
- Toggle the Enable One Page Checkout option to On.
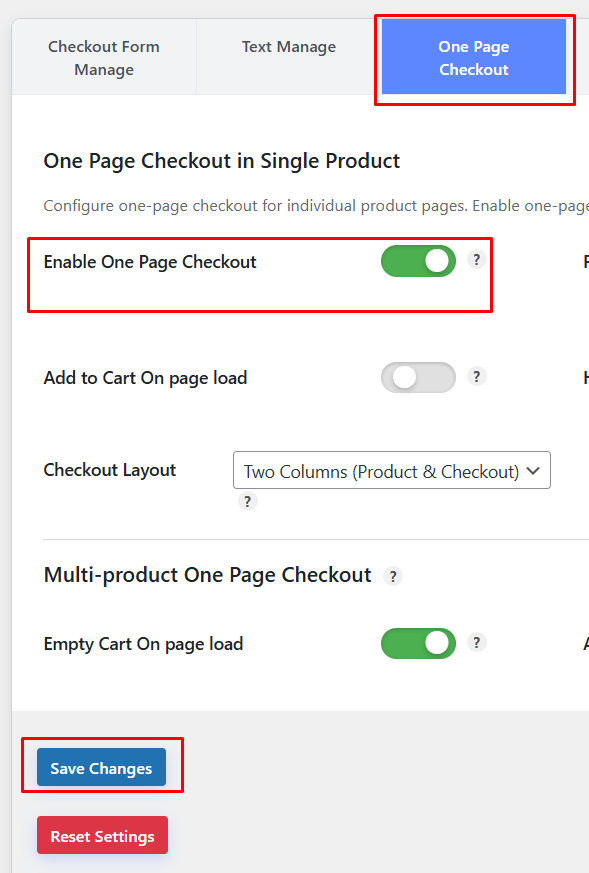
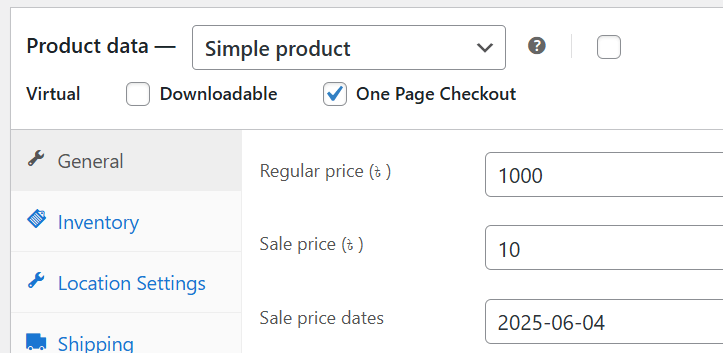
Step 3: Enable One Page Checkout for Individual Products
To apply One Page Checkout to specific products:
- Go to Products in your dashboard.
- Edit the product you want to modify.
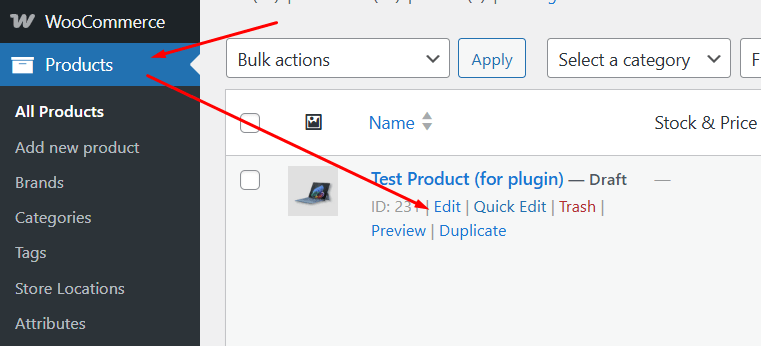
- Scroll to the One Page Checkout settings on the product edit page.
- Click the One Page Checkout option to On.
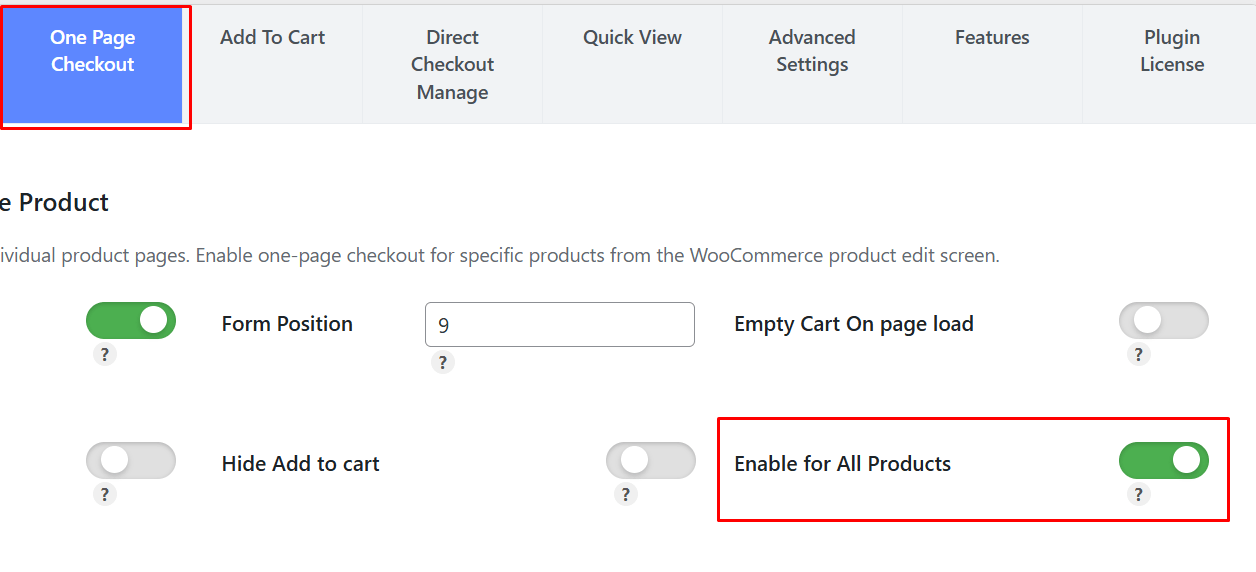
Step 4: Enable One Page Checkout for All Products
If you want to apply One Page Checkout across your entire store:
- Go to Onpage Checkout > One Page Checkout.
- Turn on the “Enable for All Products” option.
Step 5: Navigate to Checkout Form Management
- Log in to your WordPress admin dashboard.
- Go to Onpage Checkout in the sidebar.
- Click on Checkout Form Manage.
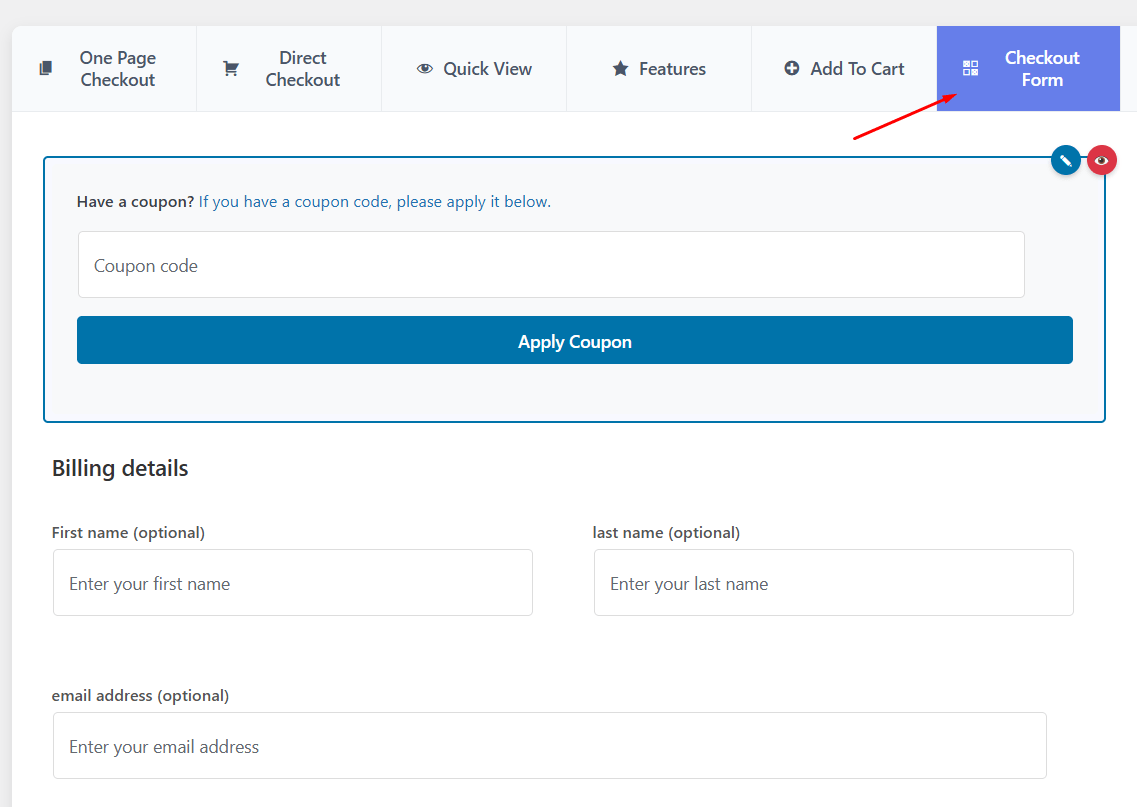
Step 6: Manage Checkout Fields
In the Checkout Form Manage section, you can customize which fields are displayed during the checkout process.
Remove Checkout Fields
Choose which checkout fields you would like to remove in the selection box. Options include:
- First Name
- Last Name
- Country
- State / District
- City
- Postcode
- Address 1
- Address 2
- Phone
- Company
- Notes
Others Removable things are:
- Remove the coupon input field at the top of the checkout.
- Exclude the shipping address fields if not applicable.
- Hide any notices or messages displayed during checkout.
- Remove the privacy policy text from the checkout page.
- Exclude payment options if you only want a single payment method.
- Remove the table displaying the products being purchased.
Step 7: Manage Headings
The Heading Manage Section lets you customize which headings are displayed:
- Remove the billing details heading.
- Exclude the additional details heading.
- Remove the order review heading for a cleaner layout.
By customizing the checkout form and headings, you can create a clean, minimal, and high-converting one-page checkout experience in WooCommerce.
Which Checkout Fields Should You Keep, Remove, or Make Optional?
Choosing the right checkout fields on a WooCommerce one-page checkout helps reduce friction without removing information your store still needs to process orders properly. Here is a simple way to review which fields should stay active, which ones may be unnecessary, and which ones should not be required.
- Prioritize Essential Contact Details: Name, email, and other core customer details should stay when they support order confirmation, communication, or delivery.
- Protect Payment-Related Information: Billing inputs required by your payment gateway should remain available so the checkout can process payments correctly.
- Remove Irrelevant Shipping Fields: Shipping address fields can often be excluded when selling virtual, downloadable, or non-shippable products.
- Cut Unnecessary Form Friction: Fields that do not help with payment, fulfillment, or order handling can usually be removed.
- Leave Secondary Details Optional: Company name, order notes, and similar inputs often work better as optional instead of required.
- Match Fields To Product Type: Physical products, digital goods, and business orders may each need a different checkout field setup.
- Review Required Status Carefully: A field should only remain mandatory when the order cannot be completed properly without it.
Common Checkout Field Customization Problems And Solutions
Customizing checkout fields can make a WooCommerce one-page checkout easier to use, but small changes can also create problems in validation, layout, or payment flow. Most issues are fixable once you identify what caused them and check the affected part of the checkout setup. Below are common problems and simple ways to solve them.
Removing Required Fields
Some fields may look unnecessary, but removing them can break payment processing, shipping rules, tax calculation, or order completion. Similar problems can happen when store owners apply changes like single-click product removal in WooCommerce without first checking how those changes affect the full checkout flow.
Fix
- Review payment gateway requirements before removing billing fields
- Check whether shipping or tax rules depend on that field
- Make the field optional instead of removing it completely if needed
Adding Too Many Extra Fields
Adding too many custom inputs can make the checkout form longer and harder to complete. This often increases friction and can slow buyers down before they finish the order.
Fix
- Keep only the fields that support payment, delivery, or order handling
- Remove any field that does not help process the order
- Review the full form length on desktop and mobile
Using The Wrong Field Type
A field may collect the right information but still cause confusion when the format is wrong. Using a text box instead of a dropdown, checkbox, or number field can make the data harder to enter and harder to manage.
Fix
- Match each field type to the kind of information being collected
- Use dropdowns, checkboxes, or number fields where they fit better
- Test whether the field format makes input easier and more consistent
Skipping Full Checkout Testing
Field changes can look correct in the dashboard but still fail during real checkout. Problems often appear only when customers fill out the form, trigger validation, or place an order.
Fix
- Test the full checkout flow before making changes live
- Try both valid and invalid inputs to check validation behavior
- Place a complete test order on desktop and mobile
Writing Unclear Field Labels
Unclear labels can make customers pause, guess, or enter the wrong information. This can slow down checkout and create unnecessary confusion in the form.
Fix
- Rewrite labels so they clearly explain what the field needs
- Use simple wording that shoppers can understand quickly
- Review the form from a first-time buyer’s perspective
Forgetting To Save Field Changes
Sometimes the checkout looks unchanged simply because the updated settings were not saved properly. This can make it seem like the customization did not work.
Fix
- Save each field change before leaving the settings page
- Refresh the checkout page and confirm the update appears
- Recheck plugin settings if the old version still shows
Breaking The Mobile Layout
Field edits can affect spacing, field order, and button visibility on smaller screens. A form that looks fine on a desktop may become hard to use on mobile.
Fix
- Open the checkout on phone and tablet screens after changes
- Check field spacing, order, and tap-friendly input size
- Adjust layout settings if any section looks crowded or broken
Ignoring Theme Or Plugin Conflicts
Some checkout problems come from conflicts between the theme, checkout plugin, payment plugin, or optimization tools. These conflicts can affect field display, validation, or page loading.
Fix
- Disable extra plugins one by one and test the checkout again
- Switch temporarily to a default WooCommerce-compatible theme
- Update all related plugins and check for compatibility issues
Is It Better to Use Default Fields or Custom Ones in WooCommerce Checkout?
Standard WooCommerce checkout fields are usually better when your store needs a simple, reliable, and easy-to-manage checkout process. Custom fields are a better option when the order requires extra details that are not collected through the regular checkout form.

A simpler field setup works well for many stores because it keeps checkout familiar and easier to complete. Customization makes more sense when you sell digital products, services, or orders that need more specific buyer information. The same idea also applies to features like showing product images on the WooCommerce checkout page, where added elements should support the order without making checkout feel crowded.
If the existing field structure already supports payment, delivery, and order handling, keeping it simple is often the better choice. If important information is missing, carefully added custom fields can improve the checkout experience without making the form unnecessarily long.
Tips to Restore Default Checkout Fields in WooCommerce One-Page Checkout
Restoring default checkout fields in WooCommerce one-page checkout helps bring back the original field structure after custom changes affect visibility, labels, order, or required settings. These tips can help remove unnecessary customizations and return the checkout form to a more stable setup.
- Review Recent Field Changes: Check which fields were removed, renamed, reordered, or marked optional before restoring the original checkout field setup.
- Reset Plugin Field Settings: Remove custom checkout rules from your plugin settings to bring the form closer to its default field structure.
- Disable Custom Code Snippets: Turn off field-related code snippets that may still override the original WooCommerce checkout field behavior.
- Check Theme-Level Overrides: Review your active theme for WooCommerce checkout customizations that may affect the default field display.
- Restore Required Field Rules: Change essential billing, shipping, and contact fields back to their original required settings where needed.
- Remove Extra Custom Fields: Delete added checkout inputs that are no longer needed and do not belong to the default form.
- Clear Cache After Changes: Refresh browser, site, and plugin cache so restored checkout fields display properly on the live page.
- Test The Checkout Again: Place a full test order to confirm the restored fields appear correctly and work smoothly.
Frequently Asked Questions
You probably have many small questions in mind as you work on improving your WooCommerce One-Page Checkout. Whether it’s about using plugins, handling settings, or improving the layout, this FAQ section is here to help. Below, you’ll find common questions that haven’t been covered yet, along with clear and useful answers to guide you through the process.
What Plugin Works Best for Field Customization?
One Page Quick Checkout for WooCommerce by Plugincy is one of the best plugins for easy field customization. It gives simple options to remove, hide, or manage checkout fields without writing code. You can also manage headings and display settings from the dashboard. It’s beginner-friendly and fits well with most WooCommerce themes.
Does Field Customization Affect Payment Gateways?
Most of the time, field customization does not affect payment gateways if you don’t remove essential fields. However, removing required billing fields can cause issues. Always test your checkout with all payment options active. That ensures your changes don’t block payments or break functionality.
Is It Possible to Add Custom Notes Fields?
Yes, you can add extra fields like notes or instructions for customers using the plugin’s custom field section. These fields are helpful for getting specific information about orders. You can place them anywhere in the checkout. Just remember to label them clearly.
Can I Translate Custom Fields for Multilingual Stores?
Yes, if you’re using a translation plugin like WPML or Loco Translate, you can translate all custom field labels. It ensures your international users can understand the checkout easily. Always check that all fields display properly in every language. Multilingual support is very important for global stores.
Which Fields Are Safe to Remove Without Breaking Checkout?
Fields like company name, address line 2, and order notes are usually safe to remove. These are often not needed for all stores. But never remove fields like name, email, and payment info. Always test the checkout after removing anything to be sure it still works.
How to Test Custom Checkout Fields Before Going Live?
Use a staging site or a test product to check how the checkout form looks and works. Fill it out as a real customer would. Try different devices and browsers for full testing. This way, you can fix issues before showing it to customers.
What Happens If I Leave a Field Unnamed?
If a custom field doesn’t have a name, WooCommerce can’t store or display the data properly. You may lose important order info. Always use unique and clear field names. It helps you find and use the data later without confusion.
Bottom Line
A well optimized checkout experience plays a big role in increasing sales and customer satisfaction. Knowing how to customize fields on a WooCommerce one-page checkout? helps you create a faster, cleaner, and more user-friendly buying journey. By removing unnecessary fields and keeping only what matters, you make the process simple and engaging for every customer.
In the end, the right balance between default and custom fields can improve conversions and reduce drop-offs. Always test your changes, keep the form short, and focus on user experience. A smooth checkout not only builds trust but also encourages customers to complete their purchase without hesitation.